Own hand
104 topics found with this keyword
|
 Дальше
19.03.2020 10:03 | Natalya Karpovich
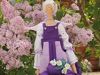
Welcome to all who are interested in my master class!
Straight to the point!
Materials we will need:
Body fabric (body or beige calico, thick cambric, not knitwear).
Body fabric (white or colored, depending on the intended color scheme of the doll's clothing), preferably of the same ...
06.03.2020 16:04 | Irina Voloschenko. Buryan
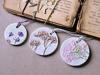
To work, we will need:
gypsum (can be used for construction);
plasticine;
plunger;
office knife;
form for filling plaster (you can caps with a cut top);
acrylic paint;
acrylic lacquer;
sandpaper;
drill;
lace;
tweezers;
dry flowers (you can use fresh flowers, lace);
Roll out the plasticine on the ...
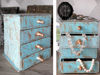
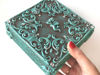
03.03.2020 15:23 | ArtFreja (m-shanti)
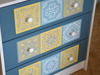
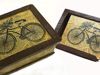
In this master class, I will share my experience of painting the RAST chest of drawers from IKEA.
I already have a detailed master class on painting and painting. If you are interested in the theme of alterations and repainting with your own hands, it will be interesting to see it.
This ...
27.02.2020 15:28 | HomeCraft`s
A box made with your own hands is a very beautiful and original gift for March 8 or any other holiday!
In this video, I will show you how you can easily make an original miniature set of drawers.
I used DVP. But you can take as a basis plywood, wood, thick cardboard.
We cut the fiberboard into the ...
19.02.2020 18:10 | Feya Mechtayuschaya
For decoration of the first notebook, I used thick cardboard with a thickness of 2 mm (binding).Cut out a rectangular shape according to the size of the notebook.Since notepads have different sizes, only the thickness of some of the strips that you can focus on will be shown.I cut a rectangle of ...
11.02.2020 16:08 | ByDarina
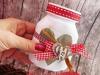
Today I want to show you a simple tutorial, thanks to which you can turn an ordinary jar into a decor item, a package for a sweet gift or a jar with wishes.
We will need:
1. Glass jar (I have one from "Nutella").
2. Scissors, pencil, sponge.
3. Plain paper.
4. Adhesive paper, glue.
5. ...
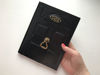
29.01.2020 10:56 | Feya Mechtayuschaya
The base for the box was made of 2 mm thick cardboard.
The main part was made of 5 parts, the cover of 3 parts.
The dimensions indicated in the video.
All the details were joined together with glue.
Two square parts connected to the lid for a tight fit to the base of the box.
I decorated the box ...
28.01.2020 11:37 | Artstudio.club
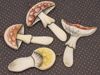
Today let's make fly agarics.
Necessary materials and tools:
chipboard (I have 1.5 mm);
thin cardboard (I have a pack of tea);
PVA glue;
thread;
wire;
acrylic paint;
scissors;
brush;
sponge;
mini drill (awl);
pencil;
nail file (sandpaper).
...
27.01.2020 15:06 | yliazhdanoba

The miniature is a fairy tale that we create ourselves, with our own hands!
The tutorial consists of three parts.
Part one: "Box"
Part two: "Miniature furniture"
Part three: "Decoration"
I hope you enjoyed it!
Sincerely yours, Julia
22.01.2020 17:59 | ArtMotiv (artbusina)
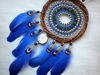
Today we will tell and show you how to make a dream catcher with wood cuts. You will need the following materials:
twigs for basis (in our case, it is willow);
wood cuts (we used cuts of aspen);
wooden beads of different sizes (we used 4, 6 and 10 mm);
stone chips (for example, lapis lazuli and ...
22.01.2020 17:42 | Magazinchik "Marya- Iskusnitsa"
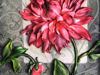
We will need satin ribbons to work with:
maroon-scarlet, width of 15 mm;
green, 6, 12, 25 mm.
You will also need a small piece of padding and a needle with a large eye.
The image is printed on a 15 by 20 cm piece of gabardine.
I print these and other images on fabric.
26.12.2019 15:37 | Feya Mechtayuschaya
I glued sheets of cardboard on a cardboard box to make it more rigid.
Then I glued pieces of newspaper over it.
On the A4 sheet, I glued a paper napkin with tape and printed a picture on it (you can print this way on any printer, both laser and inkjet).
I glued a printed napkin to the lid and then ...