DIYs & Tutorials with tree
19 publications with this material found
|
 Дальше
18.03.2020 09:56 | Hand Owl - Plotnikova Vera
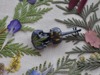
To create such a brooch, you must have a wooden billet. In order to get such a billet, you need to draw a silhouette that is dear to your heart in the vector, and then order laser cutting on wood. In my case, the base is cut from 4 mm plywood.
Then cover the entire base on both sides with black ...
18.02.2020 11:42 | Kolodozero
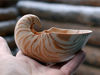
Today I have a tutorial on making shells from wood.Nature is good — you do not need to destroy a living creature, and your house can be decorated with your favorite shapes. Few fans of real sea shells know that in order to get an empty beautiful shell, the Nautilus needs to be cooked alive.
To make ...
06.03.2019 11:23 | Feya Mechtayuschaya

In this video I will show you how to make a wooden key holder with your own hands easily.
This idea is so simple that it can be repeated by everyone, and the materials for the decor you choose yourself.
I needed a stick as a base, which I sawed into the same pieces.
Instead of cutting, you can just ...
02.02.2019 17:05 | Plushky.BY
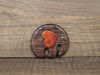
A small tutorial on how to make a cute wooden brooch at home.First, we need a template for brooches, as I cannot draw well, the template will be very simple.To do this, we need a compass, pencil and thick paper.
Take a compass and draw a circle, in my case, the circle turned out with a diameter of ...
17.07.2018 15:42 | Steamwatch

Hello, dear users!
I want to share my old work and the process of its creation :)
I focus my DIY project on a mini drawer for unusual things 300х110х220 mm
I've spent about 2 months on it. But now I understand that it's possible to assemble it more quickly. Here's the sketch:
So, ...
21.05.2018 17:37 | Yolldrik

The DIY project is unique because it describes a working process on a piece of wood with a unique natural shape. This means you can create a thing if you find such basic material :)
The tutorial is performed by my dad Mikhail.
Yours, Lika
1. I got two birch pieces of unusual shapes:
2. I ...
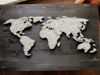
22.01.2018 11:40 | Aglaya Filippova
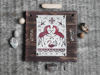
There is something 'honest' in folk patterns, something noble in their natural simplicity. And today I want to share the beauty with you!
You need:
- a wooden plate, the thickness 15-20 mm- metal (copper or whatever)- linen- screws- push pins- factory hooks or wire 3 mm, screws + welder- ...
20.10.2017 12:25 | KateMoonWorld
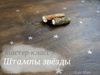
Somehow I came across an idea to use a rubber not on its original purpose :) And make a multipurpose star stamp from it — use for Halloween parties, New Year cards and so on.
Materials:
eraser
stationery knife
pencil
glue
two wooden blanks
acrylic paint
Carefully draw a star on the eraser, cut ...
13.06.2017 18:25 | Andrej Glazkov
I continue a series of works created from thread and nails.
You need:
1) wooden panel 40 x 60 x 1.8 cm;2) stain;3) varnish;4) nails (I used 25 mm);5) hammer;6) thread (I used silver silk and white nylon);7) paper for sketching;8) glue;9) sandpaper;10) titanic patience.
It begins as usual — find a ...
21.05.2017 09:45 | String Art

Today I want to share with you the mystery of creating amazing panels in the style of string art.
You need:1) wooden panel (I used 15 x 25 cm, thickness 1.5 cm);2) stain;3) varnish;4) nails (I used 16mm);5) hammer;6) thread (I used silver silk and white nylon);7) paper for sketching;8) glue;9) ...
19.04.2017 11:09 | Amaroq production

Want to present you a short tutorial. The size is 2 cm. After I made a custom jewelry set with skulls, I was bombarded with requests to take pictures of the making process, and I would like to share them with you. The work is carved from African ebony. This african blackwood is one of the most solid ...
12.04.2017 10:23 | Andrej Glazkov
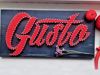
I develop my skills and want to share a tutorial on how to make an inscription and simultaneously protect you from some hidden errors.Materials:- wooden board 20 x 40 cm- nails- cotton floss- stain- varnish
Thake the board 20 x 40 cm and safely get down to work.
To emphasize the red inscription, I ...