DIYs & Tutorials with clay
19 publications with this material found
|
 Дальше
06.03.2020 16:04 | Irina Voloschenko. Buryan
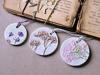
To work, we will need:
gypsum (can be used for construction);
plasticine;
plunger;
office knife;
form for filling plaster (you can caps with a cut top);
acrylic paint;
acrylic lacquer;
sandpaper;
drill;
lace;
tweezers;
dry flowers (you can use fresh flowers, lace);
Roll out the plasticine on the ...
19.02.2020 18:10 | Feya Mechtayuschaya
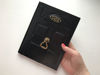
For decoration of the first notebook, I used thick cardboard with a thickness of 2 mm (binding).Cut out a rectangular shape according to the size of the notebook.Since notepads have different sizes, only the thickness of some of the strips that you can focus on will be shown.I cut a rectangle of ...
08.10.2019 11:39 | Feya Mechtayuschaya

In this video, I'll show you how to make a miniature cardboard house with your own hands. It's a house where you can store tea.
The base is made of cardboard. The dimensions are indicated in the video. Imitation of stone is made from egg trays. I applied the putty to the top and removed ...
02.10.2019 11:56 | OlgaLimon
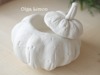
Finally, I made another detailed tutorial and it is dedicated to the pumpkin-pot. Due to the constant creative need for different containers for products, the idea was born to create a pumpkin and use it as a pot (let's call it so). Get ready for the fact that modeling requires a lot of time, ...
05.08.2019 13:08 | Keramika Ekateriny Klimentevoj
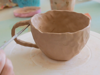
I want to show you the process of modelling pottery from clay.In the video, I will try to show all the peculiarities of modelling a cup in extrusion technique.I use clay MKF-2.
29.07.2019 12:18 | Feya Mechtayuschaya
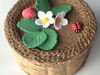
In this video, I will show how to make another basket from jute rope and cardboard. I decorated it with strawberries from floral clay.
Round base is made from cardboard. I cut the walls into stripes 3-3.5 cm wide.
There must be an odd number.
Leave 3 mm between the stripes. It is important :)
For ...
17.05.2019 13:14 | Masterskaya semi Popovyh
My name is Olesya.
If you have been with me for a long time, you have already seen how I treat nature and natural materials. I like to make simple products, using materials at hand.
Spring is so fleeting that I wanted to capture a piece of nature in spring. I have wanted to make a similar panel in ...
30.07.2018 10:45 | Korn

Dear friends!
I want to show you how I made the Blue Horse. The Horse in a Coat is a character from a Russian folk proverb. People use it as an answer to irritating questions like 'Who was there?', or 'Who did it?' — 'A horse in a coat'. In Russian, it sounds to rhyme.
...
17.07.2018 18:45 | FunIdea
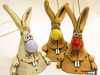
This hare may serve as a great souvenir and a developing project for kids, an interior decoration.
See the materials and tools you need below:
1. Start. First, take a small piece of clay and place it on any sturdy fabric
2. Roll it up to 5 mm thickness:
3. Give it a texture:
4. Make a circle:
...
16.07.2018 17:44 | Avtorskaya keramika (avallon-ceram)
I recommend you to start with a sketch, this helps to escape from many mistakes.
So, for work I needed:
clay — I used white clay with good plasticity,
stacks and a knife,
I use various candy stamps, but one can chop by hand,
slip — liquid clay adhesive,
dexterity and ingenuity!
1. First, sculpt ...
09.07.2018 18:05 | Holl Idej
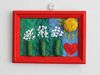
Use painted and unpainted pasta of different shapes. Be creative!
Materials:
clay/plasticine
photo frame
pasta
optional: tools for clay, toothpicks
1. Make a base:
2. Now invent a picture:
3. Press the pieces of pasta into clay:
4. You can paint:
5. And put the picture in the frame:
6. ...
24.05.2018 11:21 | Tanya Klimova (tanyaklimovastudio)
Take:
- clay
- spoon
- board for modelling
- toothpick
Take a block of black clay.
And roll a ball, attach it to the spoon:
Make wings:
And a belly:
Then the eyes:
The pupils:
And the beak with paws:
Make the nostrils:
11. For the penguin sculpt blue cap. To do this, take blue and ...