DIYs & Tutorials with glue
213 publications with this material found
|
 Дальше
19.02.2020 18:10 | Feya Mechtayuschaya
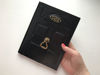
For decoration of the first notebook, I used thick cardboard with a thickness of 2 mm (binding).Cut out a rectangular shape according to the size of the notebook.Since notepads have different sizes, only the thickness of some of the strips that you can focus on will be shown.I cut a rectangle of ...
18.02.2020 11:42 | Kolodozero
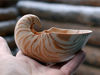
Today I have a tutorial on making shells from wood.Nature is good — you do not need to destroy a living creature, and your house can be decorated with your favorite shapes. Few fans of real sea shells know that in order to get an empty beautiful shell, the Nautilus needs to be cooked alive.
To make ...
12.02.2020 12:10 | Natalia Sinitsina
On the eve of the St. Valentine's Day, as well as as part of my creative project on a velvet embroidered handbag and a box for it, I present a variant of its decorative design.
The tutorial shows the cut, sewing and stuffing of parts, landing on ribbons and woolen threads, attaching the entire ...
11.02.2020 16:08 | ByDarina
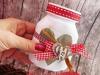
Today I want to show you a simple tutorial, thanks to which you can turn an ordinary jar into a decor item, a package for a sweet gift or a jar with wishes.
We will need:
1. Glass jar (I have one from "Nutella").
2. Scissors, pencil, sponge.
3. Plain paper.
4. Adhesive paper, glue.
5. ...
29.01.2020 11:00 | VeninnaS
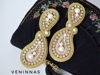
Hello, friends! Today I propose to create a product from the category of luxury jewelry. All of you, for sure, have seen collages of products on the Internet, in social networks, under the heading "I Want vs. I Can", products that I want to buy, but they are not available financially VS ...
29.01.2020 10:56 | Feya Mechtayuschaya
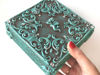
The base for the box was made of 2 mm thick cardboard.
The main part was made of 5 parts, the cover of 3 parts.
The dimensions indicated in the video.
All the details were joined together with glue.
Two square parts connected to the lid for a tight fit to the base of the box.
I decorated the box ...
26.12.2019 15:37 | Feya Mechtayuschaya
I glued sheets of cardboard on a cardboard box to make it more rigid.
Then I glued pieces of newspaper over it.
On the A4 sheet, I glued a paper napkin with tape and printed a picture on it (you can print this way on any printer, both laser and inkjet).
I glued a printed napkin to the lid and then ...
24.12.2019 17:15 | LiliaGorbach Glass

Today's topic is wintery, snowy, cold, but I promise the sun!
Tooling
1. Zac-zac wire cutters.2. Breaker.3. Glass cutter.4. "Crystal Moment" Glue, transparent for glass.5. Spectrum COE 96 glass.6. Ruler.7. Curve.8. Furnace for fusing.
Take a sheet of paper, draw a circle ...
24.12.2019 17:11 | Avtorskie ukrasheniya ot ♛Elen Domani

I want to offer you a tutorial on creating of elegant "Snow Maiden" earrings in the macrame technique.
Materials:
1.Synthetic thread;
2. Beads;
3. Hardware rings — 2 PCs.;
4. Earring fixtures — 2 PCs.;
5. Pliers;
6. Tailor's pin.
Process Description:
1. Cut 6 strands of 75- ...
19.12.2019 11:35 | Feya Mechtayuschaya
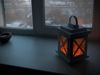
In this tutorial I will tell you how to create a decorative lantern from cardboard with your own hands(all items were made of cardboard, the dimensions indicated in the video).
I made an imitation of windows (4 pieces) and glued them together. Prepared 8 large pieces of cardboard and 8 small, glued ...
09.12.2019 14:30 | Every Gift
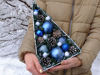
Christmas and the New Year are coming, and this means it is time to decorate all around! I Have for you a cool idea: create Christmas trees. I make a cardboard base, decorate with balls, cones and pine needles. All materials are easy to find :) This Christmas tree is a great idea for crafts in a ...
19.11.2019 17:33 | teddy_and_toys
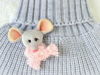
Joining the New Year mice-insanity, I suggest you a tutorial on mice-ativity!
I will show you how you can easily and simply make a cute and cozy accessory.
This mouse brooch is for little and big girls who can't live without little joys!It nestles comfortably on knitted sweaters, hats and ...